
Introduction to Homemade Cream Puffs
Homemade cream puffs are not only a delight for the taste buds but also a charming addition to any dessert repertoire, especially for young professionals navigating the hustle of daily life. Imagine hosting friends or a casual dinner party and serving these delectable treats fresh from your kitchen. They are light, airy, and filled with luscious whipped cream, bringing a touch of elegance that will leave your guests impressed.
Why dive into homemade cream puffs? The process may sound labor-intensive, but it’s surprisingly manageable and offers a rewarding sense of accomplishment. Plus, making them from scratch allows you to control the ingredients, showcasing your culinary creativity. Whether you choose to fill them with classic whipped cream, custard, or even a fruit compote, each puff can reflect your personal taste.
According to Culinary Institute of America, mastering the art of choux pastry opens doors to a variety of other pastries, enhancing your baking skills significantly. So grab your apron, gather your ingredients, and let’s embark on this delicious journey to create your very own homemade cream puffs!
Ingredients for Homemade Cream Puffs
When making delicious homemade cream puffs, having the right ingredients is crucial for the perfect outcome. Let’s dive into what you'll need to create these delightful treats!
Essential ingredients for pâte à choux
To whip up the light and airy shells, gather the following essentials:
- 1 ¼ cups of water
- 1 teaspoon granulated sugar
- ½ teaspoon kosher salt
- ½ cup unsalted butter
- 1 cup all-purpose flour
- 4 large eggs
- ¼ cup powdered sugar (for dusting)
These ingredients combine to form a rich dough that puffs beautifully in the oven, resulting in crispy shells that hold their shape perfectly.
Ingredients for whipped cream filling
Your cream puffs wouldn’t be complete without their sweet filling! For a light and fluffy whipped cream, you’ll need:
- 2 cups heavy whipping cream
- ½ cup powdered or granulated sugar
- 1 teaspoon pure vanilla extract
This simple mixture brings the signature sweetness that balances the shells beautifully.
Special equipment you'll need
To achieve cream puff perfection, equip yourself with the following tools:
- Stand mixer
- Cooling rack
- Pastry bag with plain and star tips
These tools help streamline the process from mixing to piping. But don’t worry if you don’t have a stand mixer; a hand mixer works just fine!
For more tips on making these decadent treats, check out this guide on perfecting your choux pastry skills!
Preparing Homemade Cream Puffs
Creating homemade cream puffs may seem like a daunting task, but once you get started, it's a delightful experience that leads to incredibly rewarding results. With a bit of patience and some simple steps, you can impress your friends and family with elegant pastries that taste just as good as they look. Let’s dive into the process!
Preheat the Oven and Prepare the Baking Sheets
First things first, you'll want to get your oven ready. Preheat it to 425°F (218ºC). While it's heating, line two baking sheets with parchment paper. This simple preparation will ensure that your cream puffs bake evenly and won’t stick when it's time to indulge.
Make the Pâte à Choux Dough
In a large saucepan, combine 1 cup of water, granulated sugar, salt, and the butter cut into slices. Bring this mixture to a boil over medium-high heat, stirring until the butter melts completely—this could take just a couple of minutes. Once everything is melted, turn off the heat and add 1 cup of flour. Stir vigorously until it forms a dough and starts pulling away from the sides of the pan. If you’ve ever tried making choux pastry, you know that this is where the magic begins!
Cool the Dough and Incorporate the Eggs
Now, transfer your dough into a stand mixer bowl to cool slightly. Mixing it will help prevent the eggs from cooking when you add them in. After a few minutes, gradually add the eggs, one at a time, mixing thoroughly between each addition. The final dough should be glossy yet firm enough to pipe—a delicious wave of anticipation as your cream puffs start to take form!
Pipe the Dough and Prepare for Baking
Next, fit a piping bag with a large plain tip. You can lightly grease the bag if you wish, to help ease the sticky dough into place. Pipe 2-inch circles spaced apart on your parchment-lined sheets. If you notice any peaks from piping, simply dampen your finger and flatten them for an even look.
Baking Process for Perfect Cream Puffs
Carefully place your trays into the oven, but resist the urge to open the door while they bake! Start at 425°F (218ºC) for the first ten minutes before reducing the temperature gradually over the next hour. Your cream puffs should puff up beautifully, transforming into airy, golden delights.
Whip the Cream for the Filling
While your pastries are baking, whip up some heavy cream. Combine it with powdered sugar and vanilla extract in a stand mixer fitted with a whisk attachment. Whip until stiff peaks form—this is the luscious filling that will elevate your homemade cream puffs to another level!
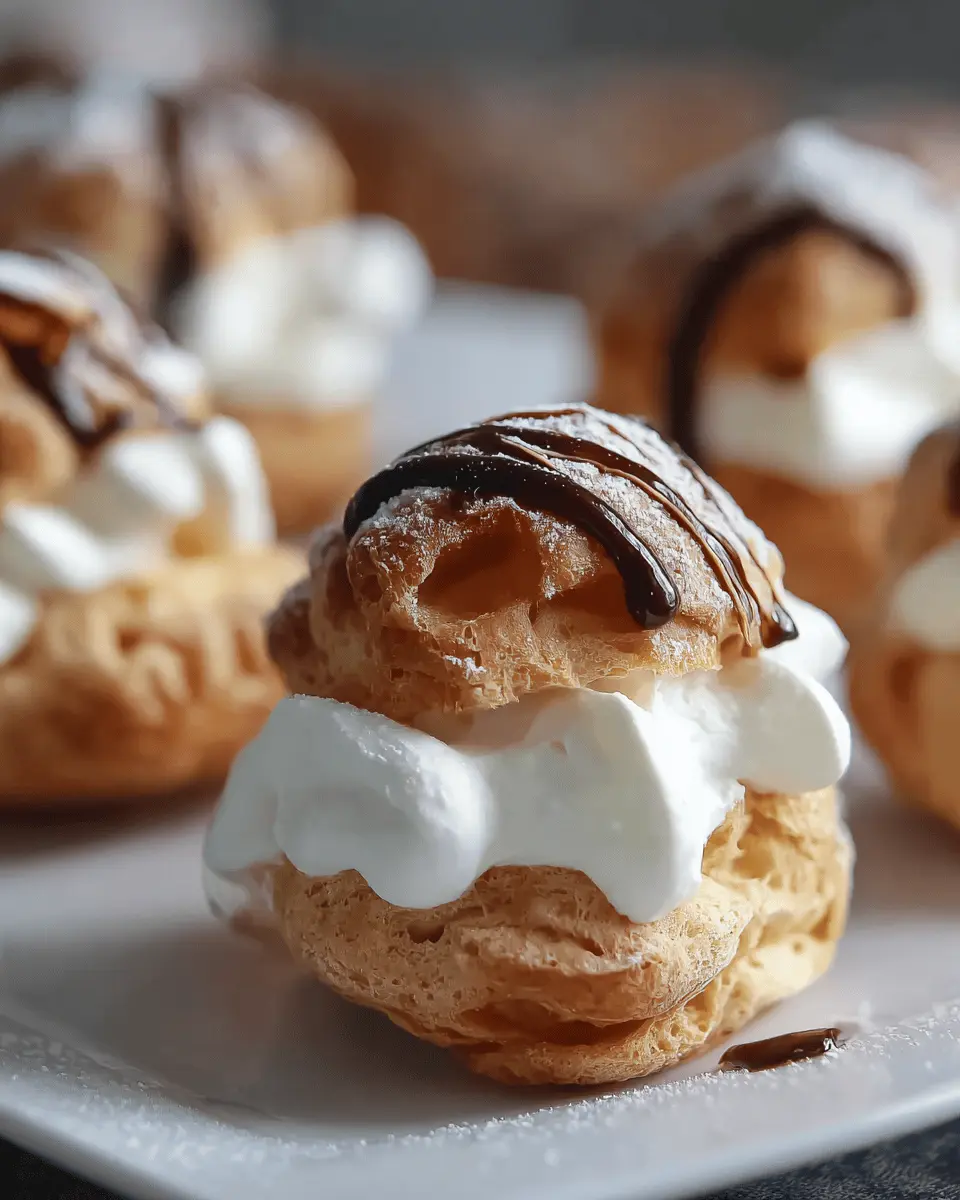
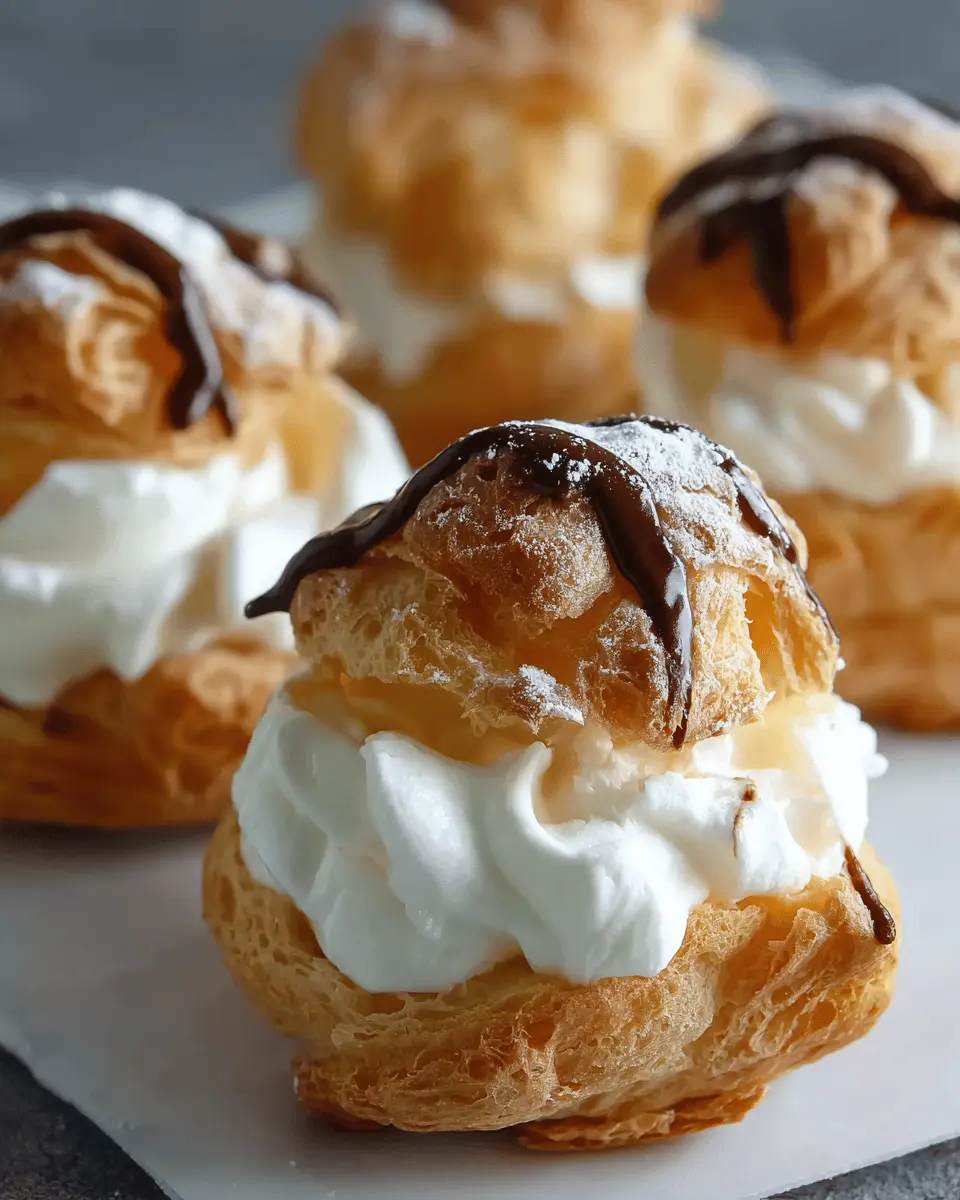
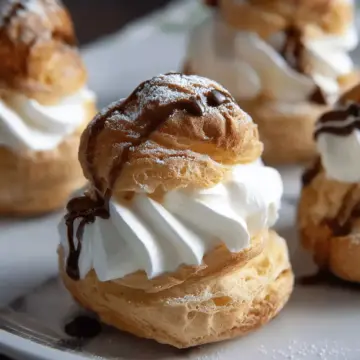
Fill the Cream Puffs and Finish with Powdered Sugar
Once baked and cooled, slice your cream puffs in half and fill them generously with the whipped cream. A sprinkle of powdered sugar on top not only adds a touch of sweetness but also enhances their visual appeal.
There you have it! You are now ready to serve these delightful treats. Whether for a special occasion or just a sweet indulgence, your homemade cream puffs are sure to impress. For more cooking tips, feel free to check out Serious Eats or BBC Good Food for inspiration!
Variations on Homemade Cream Puffs
Homemade cream puffs are incredibly versatile and can be tailored to satisfy any sweet tooth. Here are two delightful variations to elevate your cream puff experience!
Chocolate Cream Puffs
For chocolate lovers, why not add a rich chocolate ganache filling? Simply melt dark chocolate with heavy cream, whisk until smooth, and let it cool before filling your cream puffs. This decadent twist is sure to impress your guests and satisfy any chocolate cravings!
Fruit-Filled Cream Puffs
Want to brighten up your dessert? Fill your cream puffs with fresh seasonal fruits like berries or sliced mango for a refreshing summer treat. Mix the fruits with a hint of lemon juice and sugar for added flavor, and pipe the mixture into the puffs for a delightful explosion of taste. Discover more fruit dessert ideas here.
Experimenting with these variations makes your homemade cream puffs not just a treat, but a memorable experience every time you bake!
Baking notes for Homemade Cream Puffs
Tips for achieving the perfect texture
To make homemade cream puffs that are light and airy, it’s crucial to get the pâte à choux just right. Ensure your water is boiling before adding the flour, and mix until the dough starts to pull away from the sides of the saucepan. Let it cool before adding the eggs, which helps achieve that perfect rise. Remember, the dough should be thick yet smooth—if it’s too runny, your puffs won’t hold their shape!
How to store unfilled and filled cream puffs
For the best texture, it’s best to store baked cream puff shells at room temperature in an airtight container for up to 5 days. If you plan to fill them later, keep them unfilled. You can freeze unfilled shells for up to a month; just re-crisp them in a 300°F (149°C) oven. Once filled, enjoy your homemade cream puffs the same day for optimal deliciousness; however, they can be refrigerated uncovered for up to 3 days.
For more storage tips, check out resources at the Baking 101 website for expert advice!

Serving Suggestions for Homemade Cream Puffs
Best Accompaniments for Cream Puffs
When it comes to Homemade Cream Puffs, elevating their taste and presentation is a must. Serve them alongside fresh berries, like strawberries and blueberries, for a vibrant pop of color and natural sweetness. You can also drizzle a rich chocolate sauce or a tangy raspberry coulis over the top to balance the creaminess. For a crunchy contrast, consider adding a sprinkle of chopped nuts, like pistachios or almonds, for a delightful texture.
Creative Ways to Present Cream Puffs at Gatherings
Impress your guests by presenting your cream puffs on a tiered dessert stand or a whimsical cake platter. You might even arrange them in a festive circle on a large platter, surrounded by fresh mint leaves, creating a stunning centerpiece. For added flair, dust them with powdered sugar just before serving to make them look extra inviting. If you’re feeling adventurous, try filling some with flavored whipped creams, such as coffee or hazelnut, to give your dessert spread a gourmet touch.
For more serving ideas, check out this recipe inspiration that showcases dessert pairings you won't want to miss!
Tips for Making Perfect Homemade Cream Puffs
Common Mistakes to Avoid
Crafting homemade cream puffs can be tricky if you overlook a few key details. Here’s what to watch out for:
- Overmixing the dough can lead to tough shells; mix just until smooth.
- Not allowing the dough to cool before adding eggs can result in a scrambled mixture.
- Piping the dough too close together on the baking sheet? Remember they’ll expand!
For more insights, check out this expert guide on choux pastry techniques.
Advice from Pastry Experts
Top pastry chefs suggest following these tips for success:
- Use cold ingredients, like your eggs, to help the dough rise better.
- Don’t open the oven door while baking—this can cause them to collapse.
- Ensure pâte à choux is shiny and smooth before piping; it should hold its shape but not be too stiff.
Following these simple tips can lead to delightful, airy cream puffs, perfect for impressing your guests!
Time Details for Homemade Cream Puffs
Preparation Time
30 minutes is all you need to whip up the pâte à choux, which is the base for your cream puffs. Make sure to gather your ingredients and equipment beforehand for a smooth prep session.
Baking Time
For perfect Homemade Cream Puffs, you’ll spend about 1 hour and 15 minutes baking. The gradual decrease in temperature during baking helps create that wonderfully airy texture, so don’t rush this crucial step!
Total Time
In total, you’re looking at 1 hour and 45 minutes from start to finish. This includes prepping, baking, and cooling time. It may seem lengthy, but the outcome will be oh-so-worth it when you take your first bite of these delicious desserts!
For a helpful guide on mastering the pâte à choux technique, check out Serious Eats, which offers fantastic insights on making the perfect dough.
Nutritional Information for Homemade Cream Puffs
Calories per cream puff
Each delightful homemade cream puff contains approximately 116 calories. This makes them an indulgent treat suitable for any dessert table without going overboard on your calorie intake.
Macronutrient breakdown
For those keeping an eye on their macros, these cream puffs offer a balanced profile:
- Carbohydrates: 10g
- Protein: 3g
- Fat: 7g (with 4g of that being saturated fat)
This combination results in a light yet satisfying dessert that's perfect for sharing at gatherings or enjoying after a leisurely dinner.
For more insights on nutritious desserts, you might be interested in checking out Healthline, which provides an in-depth look at various nutrition topics.
FAQs about Homemade Cream Puffs
How do I prevent cream puffs from deflating?
To keep your homemade cream puffs from losing their puff, avoid opening the oven door during baking. Sudden temperature changes can cause them to collapse. Also, make sure your dough reaches the right consistency before piping; it should be thick enough to hold its shape. Lastly, when removing them from the oven, let them cool completely on a wire rack before filling.
Can I make the dough in advance?
Absolutely! You can prepare the choux pastry dough ahead of time. After making the dough, you can refrigerate it for up to 24 hours or freeze it for a month. Just be sure to bring it back to room temperature before piping for the best results. For a helpful guide on storing and reheating pastries, check out resources from King Arthur Baking.
What are the best storage practices for cream puffs?
For the freshest flavor, enjoy your homemade cream puffs the same day you fill them. If you have leftovers, store unfilled shells in an airtight container at room temperature for up to five days. Filled cream puffs can be kept in the refrigerator for up to three days, but they’re best enjoyed fresh. For revitalizing stored shells, heat them in the oven at 300°F until crisp again—yum!
Conclusion on Homemade Cream Puffs
Making your own homemade cream puffs is a rewarding experience that transforms a simple dessert into an impressive centerpiece. Not only do you control the ingredients, ensuring freshness, but the joy of mastering this French classic is unmatched. Embrace the challenge – your taste buds will thank you!
Why You Should Take the Plunge and Make Your Own Cream Puffs
When considering whether to bake homemade cream puffs, think about the benefits:
- Quality Ingredients: Control exactly what goes into your dessert, from the pastry to the filling.
- Impressive Outcome: Homemade cream puffs are visually stunning and sure to wow your guests.
- Learning Experience: Mastering the choux pastry opens doors to various other delicious recipes, like éclairs and profiteroles.
Not to mention, there's something incredibly satisfying about watching your cream puffs rise beautifully in the oven. You may find that the delightful crunch and airy texture of freshly baked cream puffs elevate any gathering or celebration! Plus, the pride that comes from serving something made by your own hands is unbeatable.
If you're still on the fence, check out some expert resources on pastry techniques or baking tips from culinary schools to boost your confidence. With a bit of practice, you'll be a cream puff pro in no time!
Homemade Cream Puffs: The Indulgent Treat You Can Master
Equipment
- Stand Mixer
- Cooling Rack
- Pastry Bag
- Plain Pastry Tip
- Star Pastry Tip
Ingredients
Pâte à Choux
- 1 ¼ cup water divided
- 1 teaspoon granulated sugar
- ½ teaspoon kosher salt
- ½ cup unsalted butter cut into 8 slices
- 1 cup all-purpose flour spoon and leveled
- 4 large eggs
- ¼ cup powdered sugar for dusting
Egg Wash
- 1 large egg
- 1 tablespoon water or milk
Whipped Cream (4 cups)
- 2 cups heavy whipping cream or heavy cream
- ½ cup powdered sugar or granulated sugar
- 1 teaspoon pure vanilla extract
Instructions
Instructions
- Preheat the Oven - Set the oven racks to upper-middle and lower-middle positions. Preheat to 425°F (218ºC). Line two sheet pans with parchment paper and set them aside.
- Make the Dough - In a large heavy-bottomed saucepan, add 1 cup of water, sugar, salt, and butter. Bring to a boil over medium-high heat and stir until the butter fully melts, about 2 minutes.
- Cool the Dough - Transfer the dough to a bowl of a stand mixer fitted with a paddle. Slowly stir on low speed (setting 2) to cool to 130°F (54ºC) or just below, about 2 to 3 minutes.
- Add the Eggs in Stages - Add eggs one at a time, mixing on medium-low speed (setting 4) until each egg is incorporated, about 30 to 45 seconds per egg.
- Piping the Dough - Add a large plain tip to a piping bag. Pipe onto the sheet pan, creating a 2-inch circular ball. Pipe at least 2 inches apart from each other.
- Brush on Egg Wash - In a small bowl, whisk together one egg and 1 tablespoon of water. Brush the tops and sides of each dough ball with the egg wash.
- Gradual Baking Process - Bake for 10 minutes at each temperature setting: 425°F (218ºC), 375°F (191ºC), 325°F (163ºC), 275°F (135ºC), 225°F (107ºC), 200°F (93ºC).
- Make the Whipped Cream - In a stand mixer fitted with the whisk attachment, add heavy cream, powdered sugar, and vanilla extract. Whip until smooth, stiff peaks form.
- Piping the Cream - Add the whipped cream to a pastry bag fitted with a large star tip. Pipe the whipped cream into the pastry bottoms and place lids on top.
- Top with Sugar - Sprinkle powdered sugar on top of each cream puff.
Leave a Reply